Saturday, October 8, 2011
Obligatory update.
Hello all. Due to school and family obligations I haven't really gotten much done. I have started ballasting though and I think I am really getting the hang of it. It will take some time, but be well worth it. I'm going to ballast everything between the rails, then do the scenery outside and finish ballasting once that's done so that my dirt won't cover my ballast. That might sound confusing, but I will be sure to post pics to clarify later on.
Sunday, August 21, 2011


WyCo Western rural switching branch. It needs a name I think...
I'm open for suggestions, but for now here are a few pics:


Friday, August 19, 2011
The HO layout is home and running!
The HO scale branch of the WyCo Western Railway is home and in place! There are a few buildings on it temporarily and the scenery will start going in soon! I will be starting to ballast the main line and such tonight and will post pics later. I have decided that since HO is a LOT more forgiving when it comes to scenic mistakes, I will practice on the HO layout and then finish the N scale side.
Wednesday, August 17, 2011
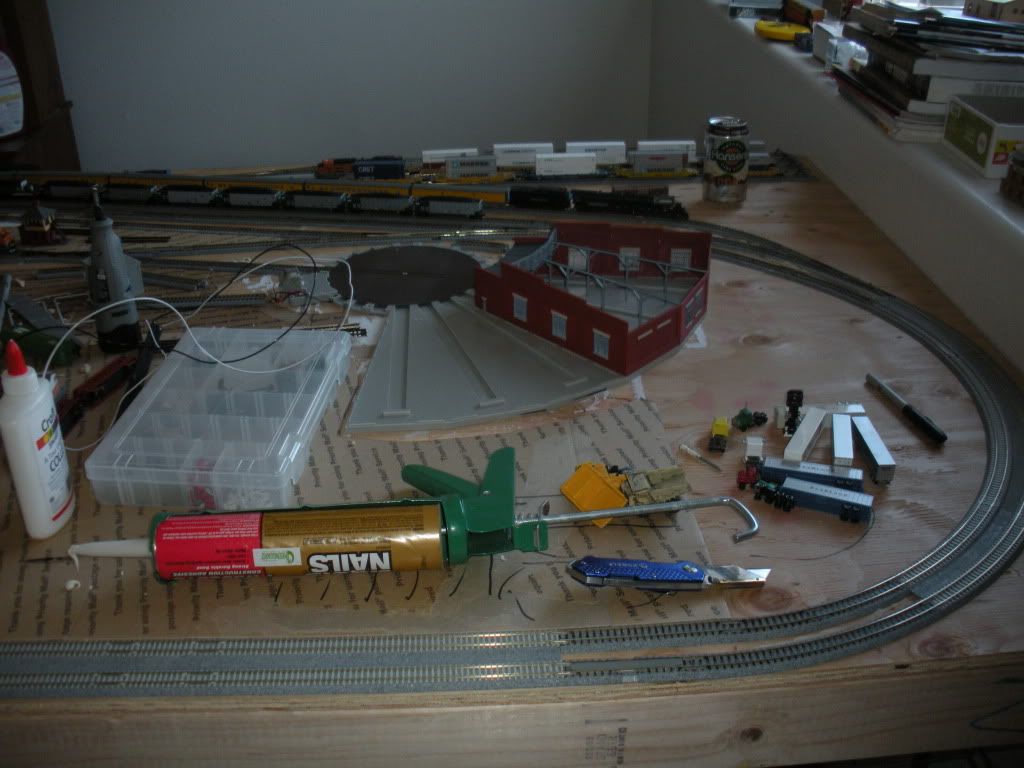
Trackwork is complete and the wiring works well!
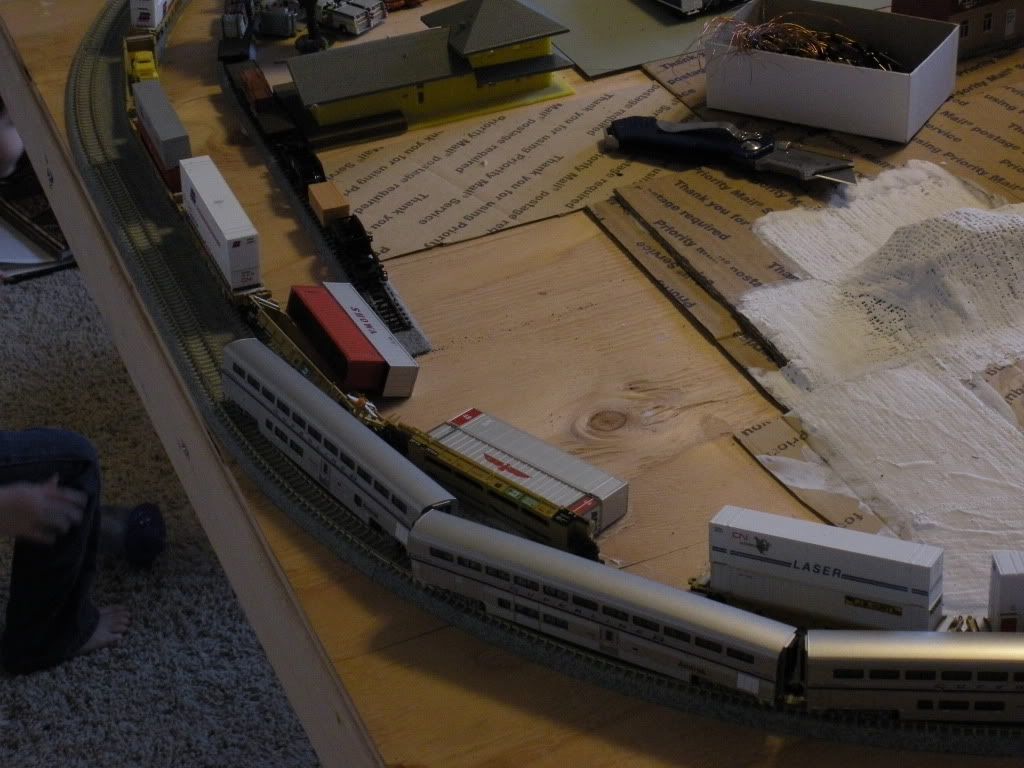
So tonight I will be going over to Bob's and bringing the layout home. I will be working on ballast over the next few days and then it will be on to dirt, grasses, and other such scenic improvements. This is going to be fun! Here is a pic of the completed track all nice and cleaned off.


Tuesday, August 16, 2011
Cork completed and trackwork 99% complete as well!
The cork has been placed and the track work is almost done! We have one more siding track to finish and then it's on to ballast and scenery! I will be going over to Bob's in a few hours to finish the track, fix up the wiring, and test it all! Here are a few pictures of the progress thus far:


I will post more updates later and hopefully with a video or at least pics of a loco operating on it!


I will post more updates later and hopefully with a video or at least pics of a loco operating on it!
Thursday, August 11, 2011
HO Layout Progress
As promised, here are a few pics of the progress I have made on my HO scale switching layout. I had to get a few pieces of cork roadbed today to finish it due to the fact that we have added a pair of switches to lead into a few more tracks that will run along either side of a CO-OP. Bob (my neighbor who is helping me) had a few things to do this evening so we are going to be finishing up the cork and working on laying track tomorrow. With any luck, the track work will go a lot smoother than the cork went. There were a few bumps along the way, but that was due to the fact that we changed the plan a bit and the modifications were made as we went. Here are the pics:


Tuesday, August 9, 2011
New layout construction has begun
My neighbor and I have started work on my new HO scale layout. We are using the benchwork that was once his Union Pacific Greeley Sub and so far we have benchwork done and some cork roadbed laid. We will pick it up again tomorrow and hopefully if we can keep up the level of progress, we should have a good bit of track laid as well as the cork finished. When the track work is all done and electronics installed (at least for the track wiring), the layout will be moved to my house and set up in the train room. Instead of the "roundy round" layout I wanted, this one is purely switching. It will measure 28" x 10'7" and is a modified version of this plan:

It will have much different scenery from what is seen in this plan. I will have a CO-OP with grain elevators in the lower left corner, and some other rural industries scattered throughout the layout with a lot of the ground cover being dirt or Wyoming plains colors. I will get pics of the progress tomorrow afternoon.

It will have much different scenery from what is seen in this plan. I will have a CO-OP with grain elevators in the lower left corner, and some other rural industries scattered throughout the layout with a lot of the ground cover being dirt or Wyoming plains colors. I will get pics of the progress tomorrow afternoon.
Sunday, July 31, 2011
Trouble already...
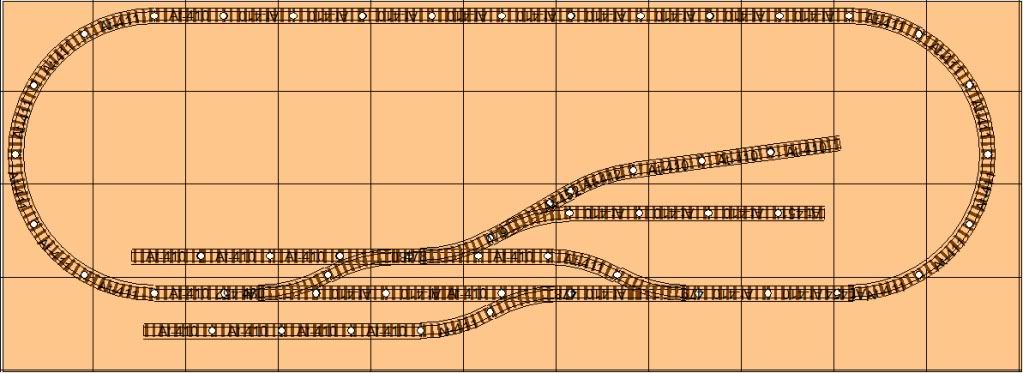
Ok. So that first idea for the new layout was a bit of a bust. I have decided that if I am going to run a full loop on here, I will need at least a 22" turn radius. The only problem with that is that really cuts down on how much straight mainline I can fit into this thing. If I build a layout with a complete oval, I will only be able to realistically fit a loco and up to 7 cars behind it on the line and an even shorter train on the "staging" track in back of this new design:
My only other choice for an interesting HO layout in the available room would be to do a 28"x12' shelf switching plan. I really want to have an oval, but I suppose it's not entirely required. I would just like to be able to cut my locos loose and let them run every now and then. I have been told that I can just get my kicks with continual running by going to the museum and volunteering a lot more, but I can't always do that. I suppose I will look at some switching plans and see what I can come up with. Who knows? Worst case scenario I will just have to wait and build a new layout in a few years. Oh no! Build a new layout?!?! Oh, the torture! ;) (sarcasm cannot achieve its full effect over the internet, but you get the idea lol)
If I do decide to build the layout on the plan above, this is a rough render of what my rooms layout will look like with both layouts in there:
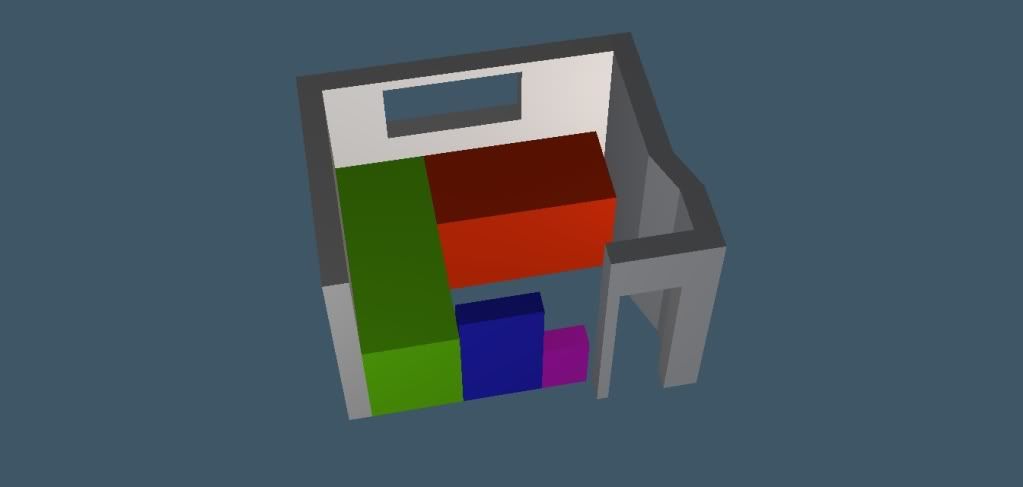
The green box is where the HO scale layout will go, the red box represents my N scale layout, the blue is my desk, and the purple box will be my little wire shelving unit.
My only other choice for an interesting HO layout in the available room would be to do a 28"x12' shelf switching plan. I really want to have an oval, but I suppose it's not entirely required. I would just like to be able to cut my locos loose and let them run every now and then. I have been told that I can just get my kicks with continual running by going to the museum and volunteering a lot more, but I can't always do that. I suppose I will look at some switching plans and see what I can come up with. Who knows? Worst case scenario I will just have to wait and build a new layout in a few years. Oh no! Build a new layout?!?! Oh, the torture! ;) (sarcasm cannot achieve its full effect over the internet, but you get the idea lol)
If I do decide to build the layout on the plan above, this is a rough render of what my rooms layout will look like with both layouts in there:
The green box is where the HO scale layout will go, the red box represents my N scale layout, the blue is my desk, and the purple box will be my little wire shelving unit.
Sunday, July 24, 2011
A new dawn on the WyCo Western....
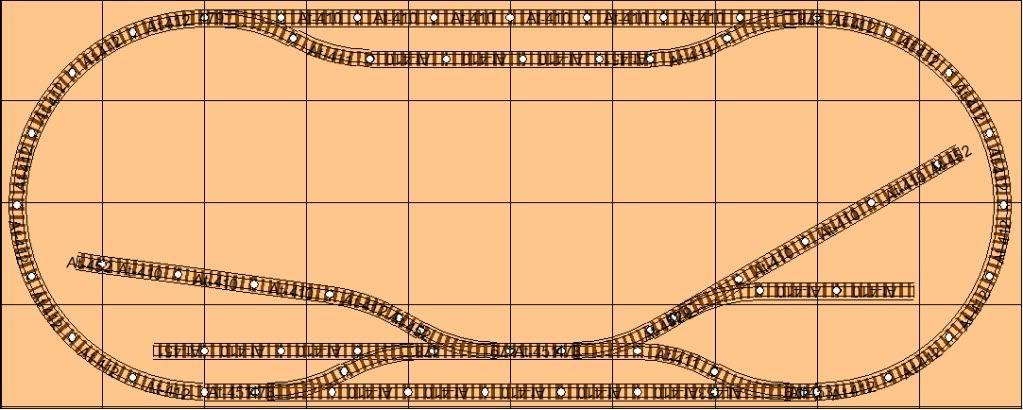
I have recently began to volunteer at the Greeley Freight Station Museum and ran some trains on their 5,500 sq. ft. layout. It was incredible!! The experience made me hungry for more and has made me even more anxious to get back to work on my home monstrosity. So far I have only made a few changes, so no update pics or video yet. However, the big change that I feel is worth noting is that I have gotten some HO scale equipment in a trade and will be building an HO layout in my train room. This one will follow in the original N scale WyCo Western's footsteps in that it will be set in a rural Wyoming setting and will have a few rural structures and some switching possibilities as well as a continual loop track. I am concerned that it won't leave much room to move in there (only about a 2 foot alley) and am considering making the layout a 2x8 switching layout only. I am not thrilled with that, but will if I have to. Here is the track plan for my HO layout so far. I am going to be going over it very carefully and will be trying to perfect the plan before the construction phase to minimize room and maximize enjoyment.
Thursday, April 28, 2011
Sticky stuff and rocks.
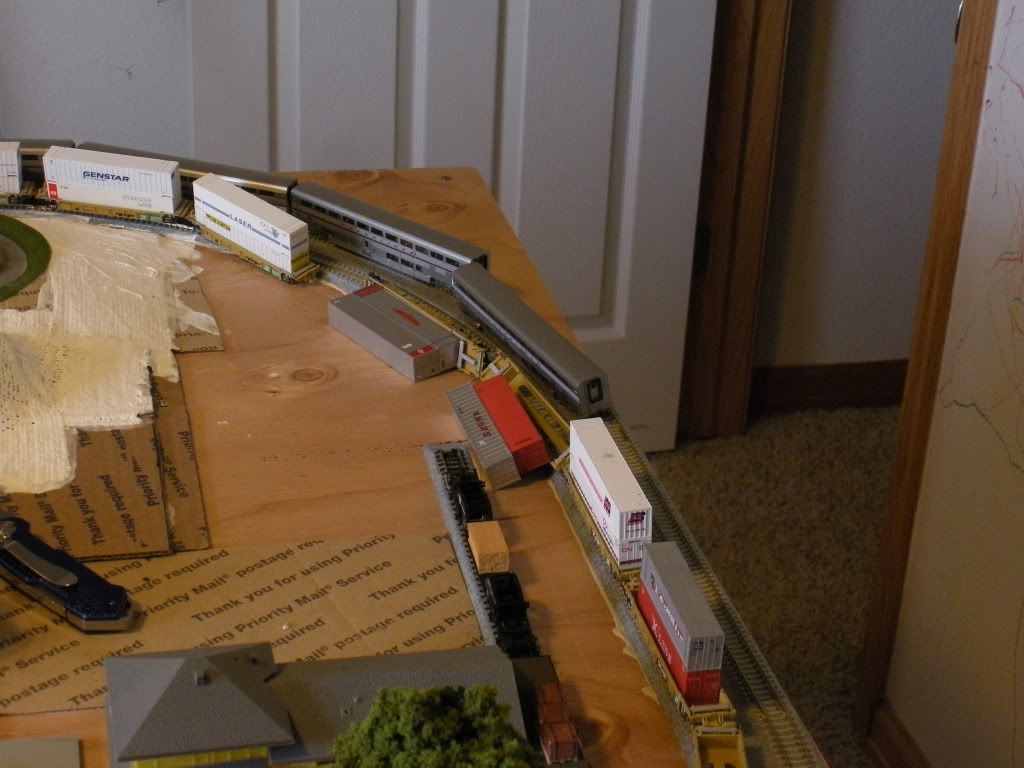
That's right! I finally decided to start ballasting. I also took out some bits of scenery to make things a little more believable. Instead of having a flat cut along my main street next to the tracks, I cut some of the cardboard away so I can have a slope going down and also some room to ballast that part of the track when I get there. I should have taken before pics to show the difference, but I think some of my previous pics may show what I'm talking about. If so I will post before, during, and after pics when I post more updates. We also had our first train crash here on the WyCo Western. An act of Babby knocked an Amtrak superliner train and some well cars from a BNSF double stack train off the rails. (Then my girlfriend not paying attention and leaning over the track took out some more)
Friday, April 22, 2011
Updates for the sake of updates...
I have been pretty busy with homework and job apps so I haven't done much work on the layout. I did finally glue down the lamp posts so my "zoning committee" would be happy. I also took the corner turret building off and am currently repainting it since I never really liked the pea-green color it was before. I'm also in communications with an awesome modeler and all around AWESOME human being by the name of Jason Smith (aka Superturbine), and he will be turning my Kato GS4 into an FEF-3 and numbered UP 844 to go with my UP passenger equipment and provide for one heck of a surprise for my little boy! So, other than getting a few pics of my latest kitbashing project posted, thats about all for now! I'm hoping that the next time I update I will have some pictures and maybe a video for you guys.
Thursday, April 14, 2011
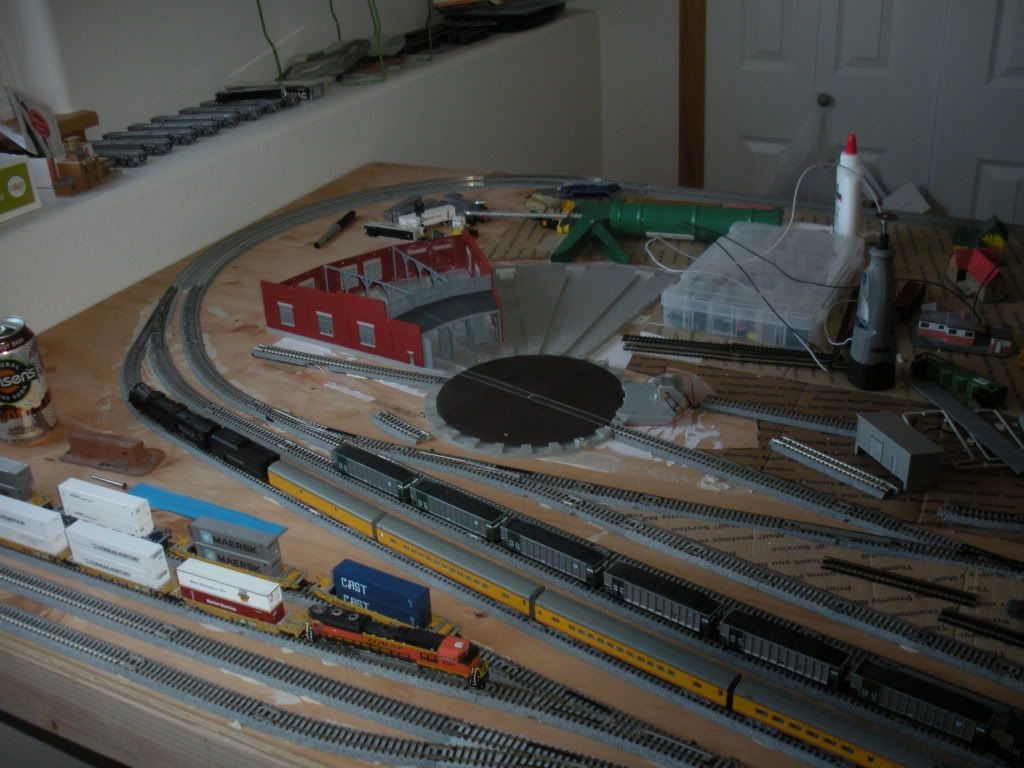
Roundhouse construction complete.
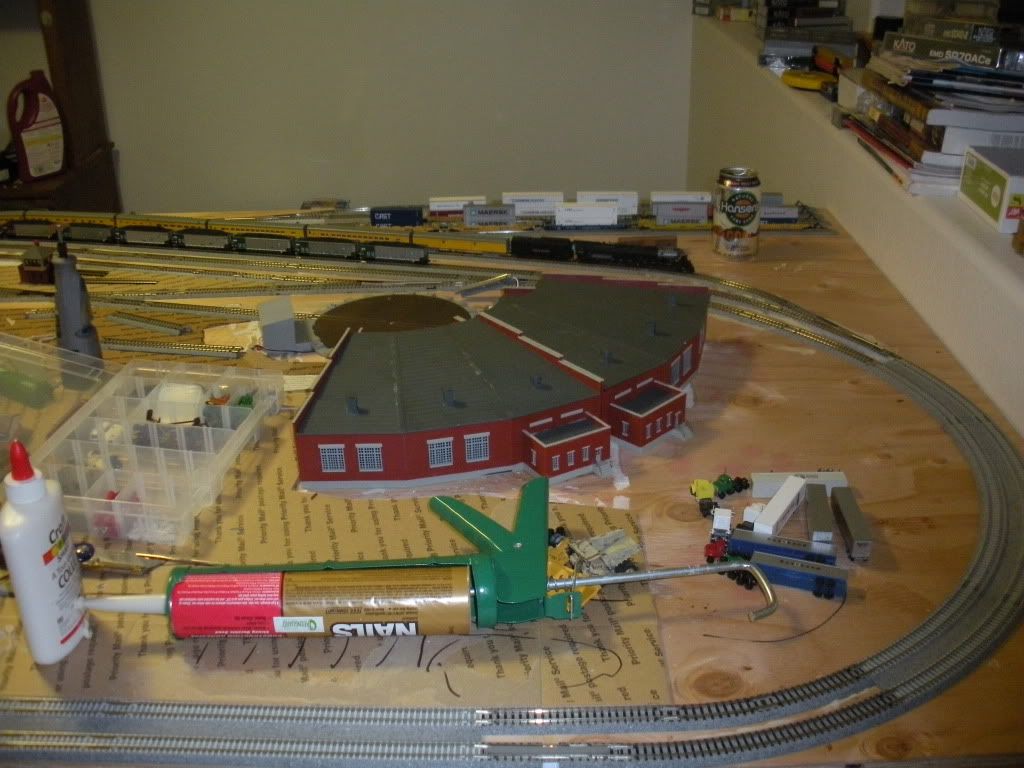
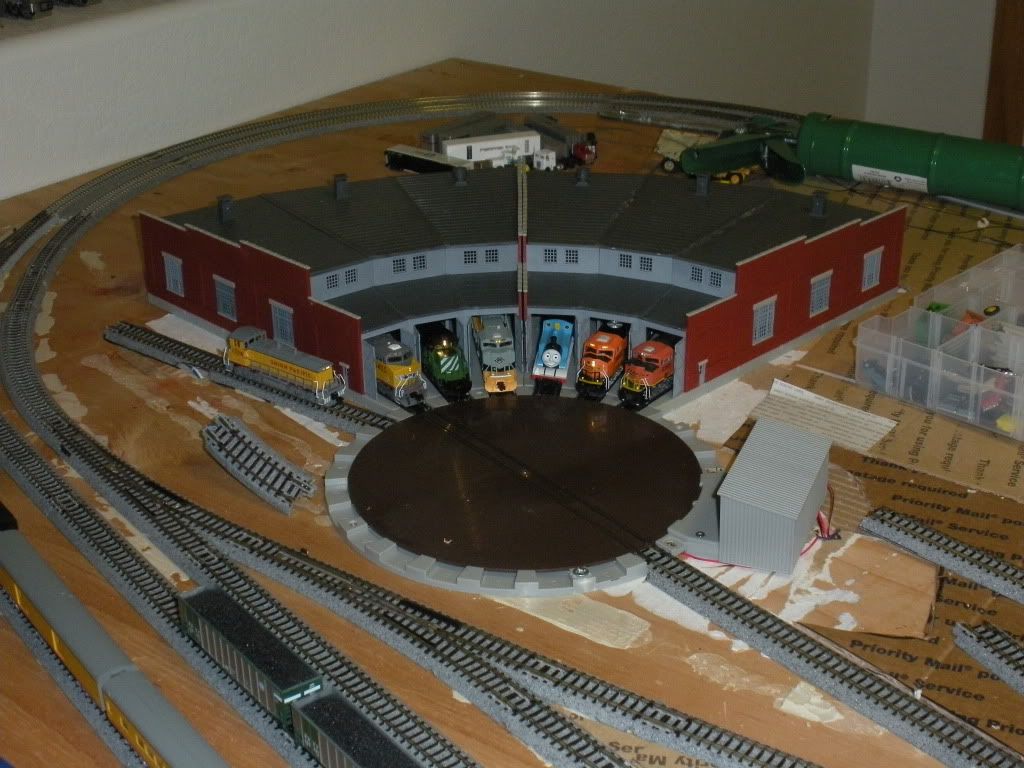
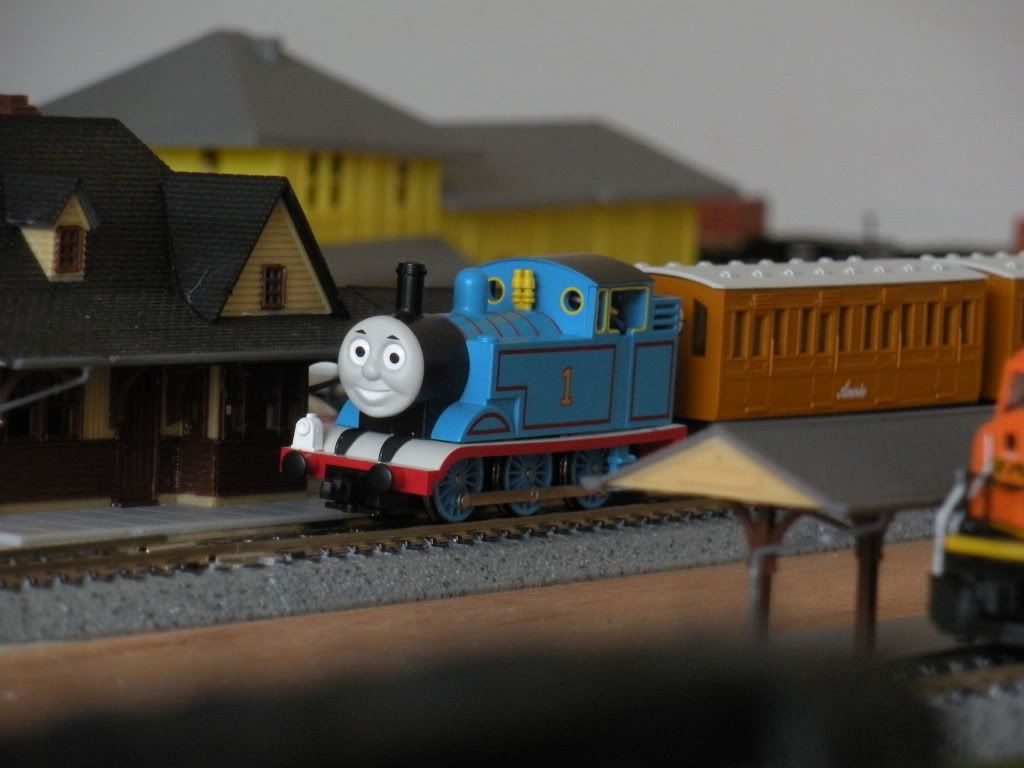
I have both of my three stall roundhouses built and in place as well as the track wired in and tested. Now all that's left to do is tack down the tracks. Here are a few pics of the roundhouse/turntable complete with locomotives. Our Chief of Transportation (my 4 year old) insisted that Thomas be included in the group photo as well. He is leaning a bit in the pic, but once I get the tracks all tacked down that shouldn't be an issue anymore.
Wednesday, April 13, 2011
Fun with the camera.
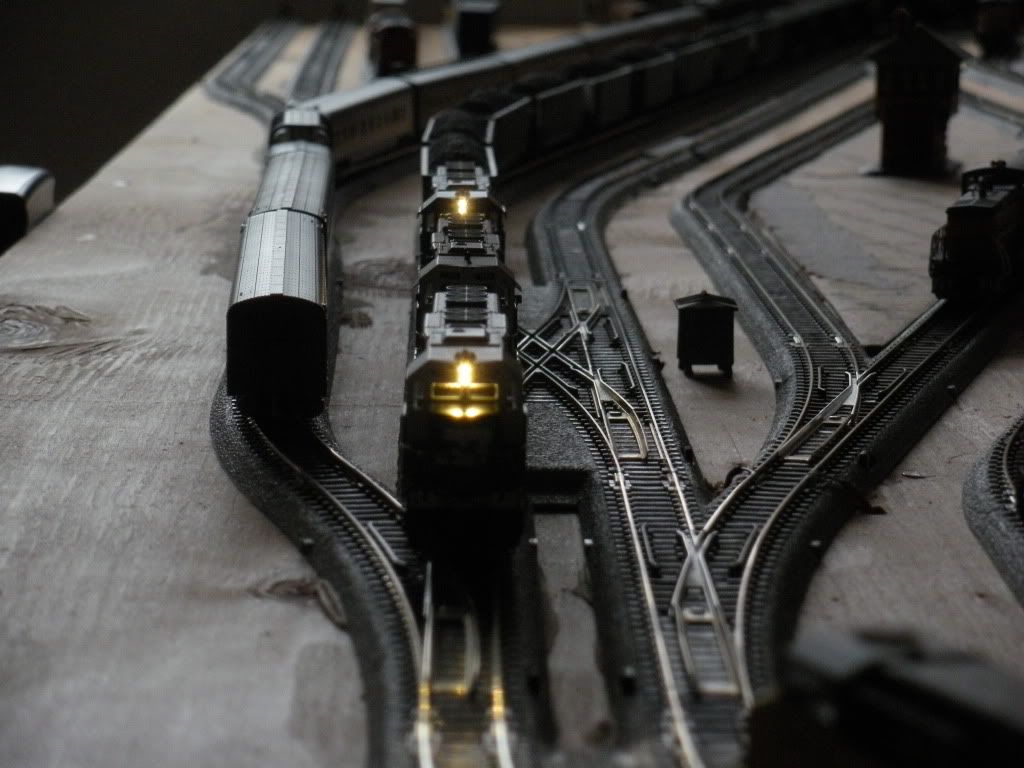
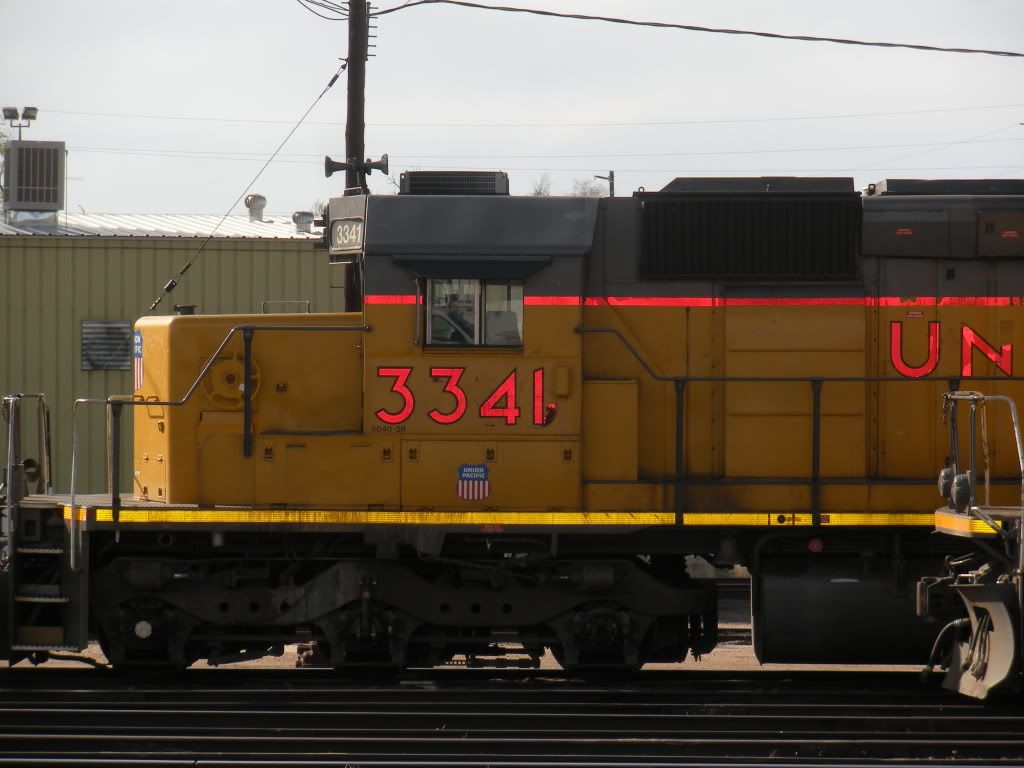
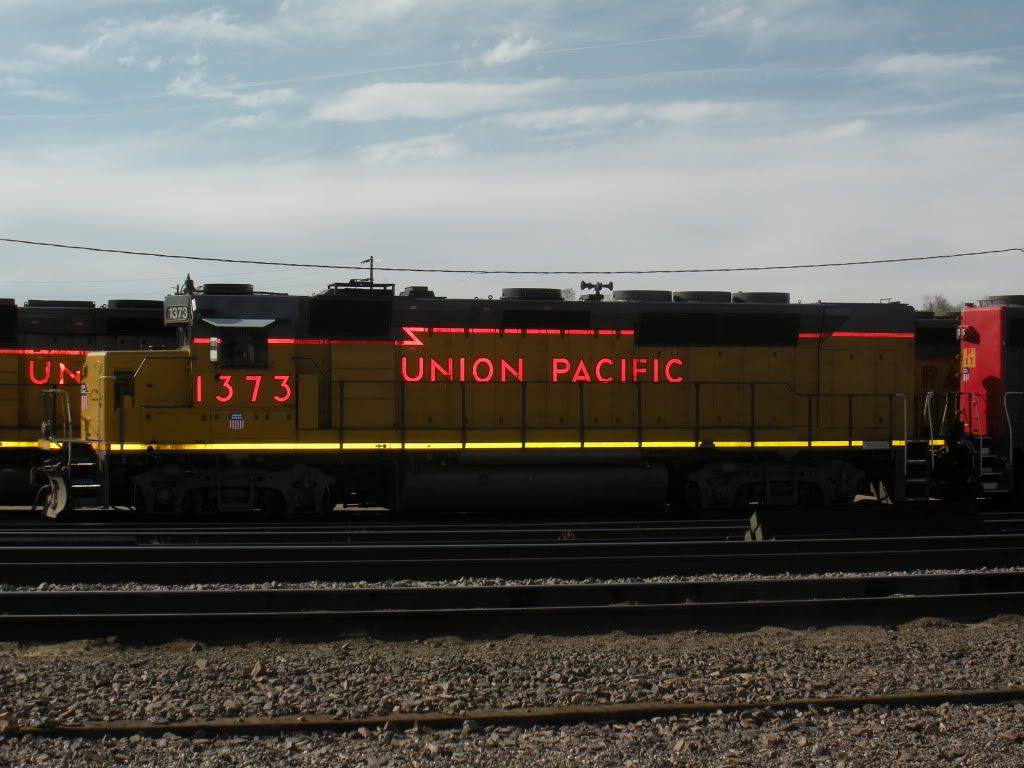
This week I spent a little time playing with the settings on my camera and randomly screwing off and I managed to get a few really cool pics. I decided it would only be polite to share them with everyone! Here for your viewing pleasure are a few of my favorites. The first two are on my layout and are of my BN coal train and everyone's favorite little tank engine. The other two were taken at the Union Pacific depot in LaSalle, CO. Enjoy!
Monday, April 11, 2011
Changes to the layout are going smoothly...almost.
P.S. The base to the second roundhouse section is only there to check clearance in the cut out sections of cardboard and to show where it will be placed. It has not been tacked down yet.
Thursday, April 7, 2011
This is a pretty neat video.
My little boy loves it and calls it his train song. The song is Long Black Train by Josh Turner and it was set to some video of a Big Boy from one of the train sim games. This is not mine, and would like to give credit to BigBoyCarlos for making this neat video.
Wednesday, April 6, 2011
Proposed changes to the track plan. Good idea or not?
Hi all! There has been a few interesting additions to the WyCo Western's real estate portfolio recently including a three stall roundhouse. I have proposed a change to the town's planning and zoning committee (AKA my girlfriend) and it has been decided that a turntable and roundhouse would possibly be a bad idea. So this of course means I'm probably going to do it anyway because it means I will have a new toy to play with. So, here is my proposal for the change in the track plan. I am going to take out the switch and the two tracks that would have led to the small engine shed I originally intended to put on there and in its place I will have a roundhouse and seven tracks coming off of it. I want to have three going into the roundhouse as well as three more already in place with wiring run to and holes drilled in case another roundhouse is acquired as well as an exterior track that will eventually be wired to a nifty little gizmo that NCE makes to control a program track. Without further ado, here is a look at before and after images of what my plan for this will look like. Also, please forgive my MS Paint quality graphics on some of the lines. No one ever accused me of being an artist! =)
 |
| Before |
 |
| After |
Here is also a link to the NCE item I mentioned earlier in the post: NCE Auto SW
It automatically shuts down all main lines while in program track mode to prevent any other locos from accidentally being programmed. This will also save me from having to take ALL my engines off the track when I want to program something.
Monday, April 4, 2011
Layout Update!
In trying to get caught up to current, I will go ahead and post my latest video. This was posted on YouTube a few weeks ago, and has been quite popular thus far. Hopefully my next few videos will be as well!
Time for a happy dance!

Sunday, April 3, 2011
Kitbashing projects and wish lists...

Friday, April 1, 2011
Scenery begins!!
When coming up with a layout for my town, I knew that an entirely flat surface would be kinda boring. To combat this I decided to raise a section by a few scale feet to add a little interest. I also knew that I wanted a majority of the rest of the ground to be raised to track level for different reasons. To accomplish this in a uniform manner, I used USPS flat rate boxes that I had lying around (and a few I may have "liberated" just for this reason). They work wonderfully and can cover a lot of space quite easily. I then decided to start building my town on the elevated section and this album shows just how I did it.
***PLEASE NOTE: THIS WAS MY FIRST EXPERIENCE WITH PHOTOBUCKET AND THE ALBUM UPLOADED BACKWARDS. PLEASE START WITH THE LAST PICTURE IN THE ALBUM AND WORK IN REVERSE ORDER!!!***
How I made my Main St.!
***PLEASE NOTE: THIS WAS MY FIRST EXPERIENCE WITH PHOTOBUCKET AND THE ALBUM UPLOADED BACKWARDS. PLEASE START WITH THE LAST PICTURE IN THE ALBUM AND WORK IN REVERSE ORDER!!!***
How I made my Main St.!
Thursday, March 31, 2011
First video made of the Hillsdale Line
This video was made well over a year ago and since then not only has there been progress made, but it was moved out of a cramped and messy storage room into a spare bedroom. In this video, my little boy (who was 3 at the time of shooting) shows us just how easy running trains can be! Enjoy!
Welcome aboard the WyCo Western!
Welcome to the official page of the WyCo Western Railway's Hillsdale Line! This is a fictional model railroad that is set in a small portion of Wyoming and the track plan is based off of the Salt Lake Route appearing in the January through June 2010 issues of Model Railroader Magazine. This will be my first layout (well, to be completed anyway) and I'm hoping that it will not only look great, but give me plenty of opportunities to practice my modeling skills. I will be documenting not only my progress on they layout, but any projects related to model railroading as well and hopefully this may prove to be educational as well. Anyway, that's enough from me. Let's run some trains!
Subscribe to:
Posts (Atom)